Designer’s Guide: Photoshop Action – Multiple DPI Resizing for Android
We’ve talked about Android’s DPIs and how we should use Full HD (1920x1080px) documents when creating apps for Android devices so we would create the XXHDPI graphical assets along with any other resolution assets we may require.
Why you need it
Exporting all the graphical elements at 4 or 5 different resolutions can be quite time consuming and a little help can go a long way. So instead of hitting “save for web”, calculating and then resizing for each individual DPI, why not use a scripted action to do the heavy lifting.
How it works
Basically the concept is quite simple: take the largest size image, assume it’s scaled for xxhdpi and make that iteratively smaller while exporting at each step along the way. Take a look at the image below to get a better understanding of the process. The DPI is used for the Android devices the app will finally run on so you can work at 72ppi (pixels/inch) in Photoshop as long as the file you’ve started with is large enough in pixels.
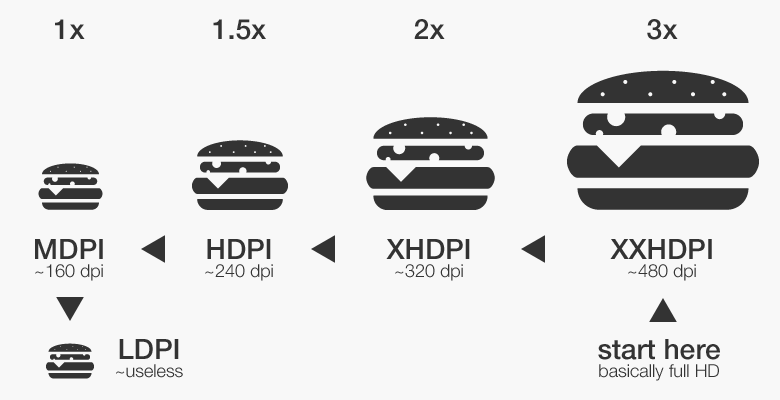
To get a better idea, let’s take the example of a 96px icon at xxhdpi. By the way, this is the size at which you’ll receive all icons if you download the Android action bar icon pack (all these icons are in vector format so you’ll be able to resize them to whatever you want later on… so you’re not limited to 96px). Now, if the xxhdpi icon is 96x96px, the action will export it, then scale the document to 66.(6)% (66.7% actually), now it’s 64px(xhdpi) export that again and scale the document to 75% and now it’s 48px(hdpi), export and scale the document to 66.7% and now it’s 32px(mdpi), export that and scale the document to 66.7% and now it’s 24px(ldpi) and finally export that.
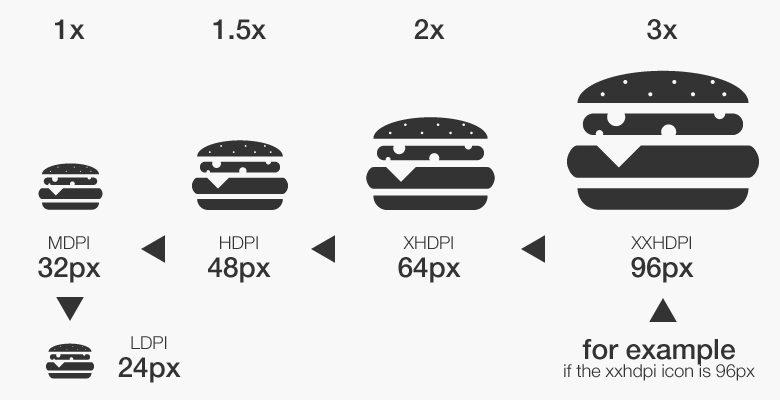
Now because the resize should be to 66.666666666…% instead of 66.7% I’m still expecting to run into some issues at some point but I’ve been using it for a while and found nothing wrong with the files it creates.
What you get
There are 2 separate actions included in the set. One is called “From Current” which will export the currently used document without any modifications, scaling it down as it goes. This one is useful for icons or any other graphical assets that require padding directly inside the image.
The other one is “In New Document” and it will copy the layers you have selected into a new document, merge the layers and remove any transparent pixels, effectively resizing the new document to the size of the selected layers. Use this last one if you don’t require padding. Button backgrounds and the like can make use of it just before you add 9-patching elements to them like we’ve discussed last week.
If you’re working on Android design, I really hope that it helps, just click “Download” to… download and have fun. If you run into any issues or want to learn more about Android design , just drop a comment down below or send a mail over at madalin@mready.net and I’ll try to get back to you as soon as possible.
Remember, if you want to keep up to date with all the mReady articles and lots of other cool stuff, be sure to follow us in Facebook.




Wow Thanks !!!
Hello there,
First of all, thanks for the action. I am new to these exports for mobile devices and straight away faced a problem / confusion.
I am supposed to export in following resolutions
_ldpi_320x480
_mdpi_480x800
_hdpi_720x1280
_xldpi_900x1600
_xhdpi_1080x1920
I tested your actions and compared them with manual exports on each resolutions. Doing so only the 1080×1920 resolution images matched sizes, the other resolutions were all different. I also used the script from http://uncorkedstudios.com/blog/export-to-android-photoshop-script and it exported same sizes as your action. So am i doing it wrong by manually resizing my files and exporting?
Please let me know. Thanks and keep it up.
Thank you so much. I’ve been looking for this a long time!
Hi….
Thanks for this nice tutorial….I wants to know about the dimensions (W*H) for differenct DPIs.
Lets say:
ldpi: what should be the screen dimension for desiging the layout.
mdpi: //
hdpi : //
xhdpi: //
xxhdpi: //
Hello.
Sorry to say this, but your calculations are wrong. That’s why people that tested the actions got different sizes than expected. Let’s use the multipliers to make the math easier:
You reduce from 3x (xxhdpi) to 2x (xhdpi) by multiplying by 66.6%. All good here. But then you multiply by 66.6% again to reduce to 1.5x. The correct miltiplier would be 75%, as your new base size is 2x, instead of 3x.
Hi Lucas, thanks for dropping by and spotting the issue. Surprisingly though it’s not an issue with the action, rather one with the article where I forgot to mention that the 2nd step is indeed 75% instead of 66.(6)%.
I’ll be sure to change the article as soon as possible but the action itself is just fine.
Hi there,
I wrote a command line tool which can convert icons automatically to the right sizes for the different screen densities and which also saves everything in the right directories – it even supports the version structure of androids res/ folder.
Nicest thing about it – and an extension to your software – is that it can also replace colors. This makes it very powerful when you want to have different versions of your icon (“enabled”, “disabled”) or (“dark” and “light” theme).
Have a look at it 🙂 It runs on Linux and Windows.
http://www.android-msapps.com/index.php?category=dev&subcategory=converter
Best
Markus
Has anyone updated this for xxxhdpi?
Thanks MAN !!! You are a life saver. All the other Photoshop Actions were just scaling up the given up and not down. But your’s did it.